
I hope this guide will help new people to get into pvp or even better with it. Here you can find many specific information and this can be overwhelming for new players. Therefor I suggest to read the interesting articles first and then test it step by step. You can always come back later to refresh your memories.
PS. I try to keep this guide updated, and you can find more interesting articles (like this one) in my Field Reports section. There you can also find an import version of my overview-settings.
This article is split in 12 chapters...
| 1. | Chats |
| 2. | Target Window |
| 3. | The top left corner of the UI |
| 4. | Drones |
| 5. | Overview |
| 5.1 | Overview Settings |
| 5.2 | Overview Colors <<< most important for RvB members |
| 5.3 | Overview Columns |
| 5.4 | Overview Ships |
| 5.5 | Overview Taps |
| 5.6 | Overview Miscellaneous |
| 6. | Directional Scanner |
| 7. | People & Places |
| 8. | Fleet |
| 9. | Control Panel |
| 10. | Selected Item |
| 11. | Navigation |
| 12. | Locking Objects |
Here is a picture of my screen.
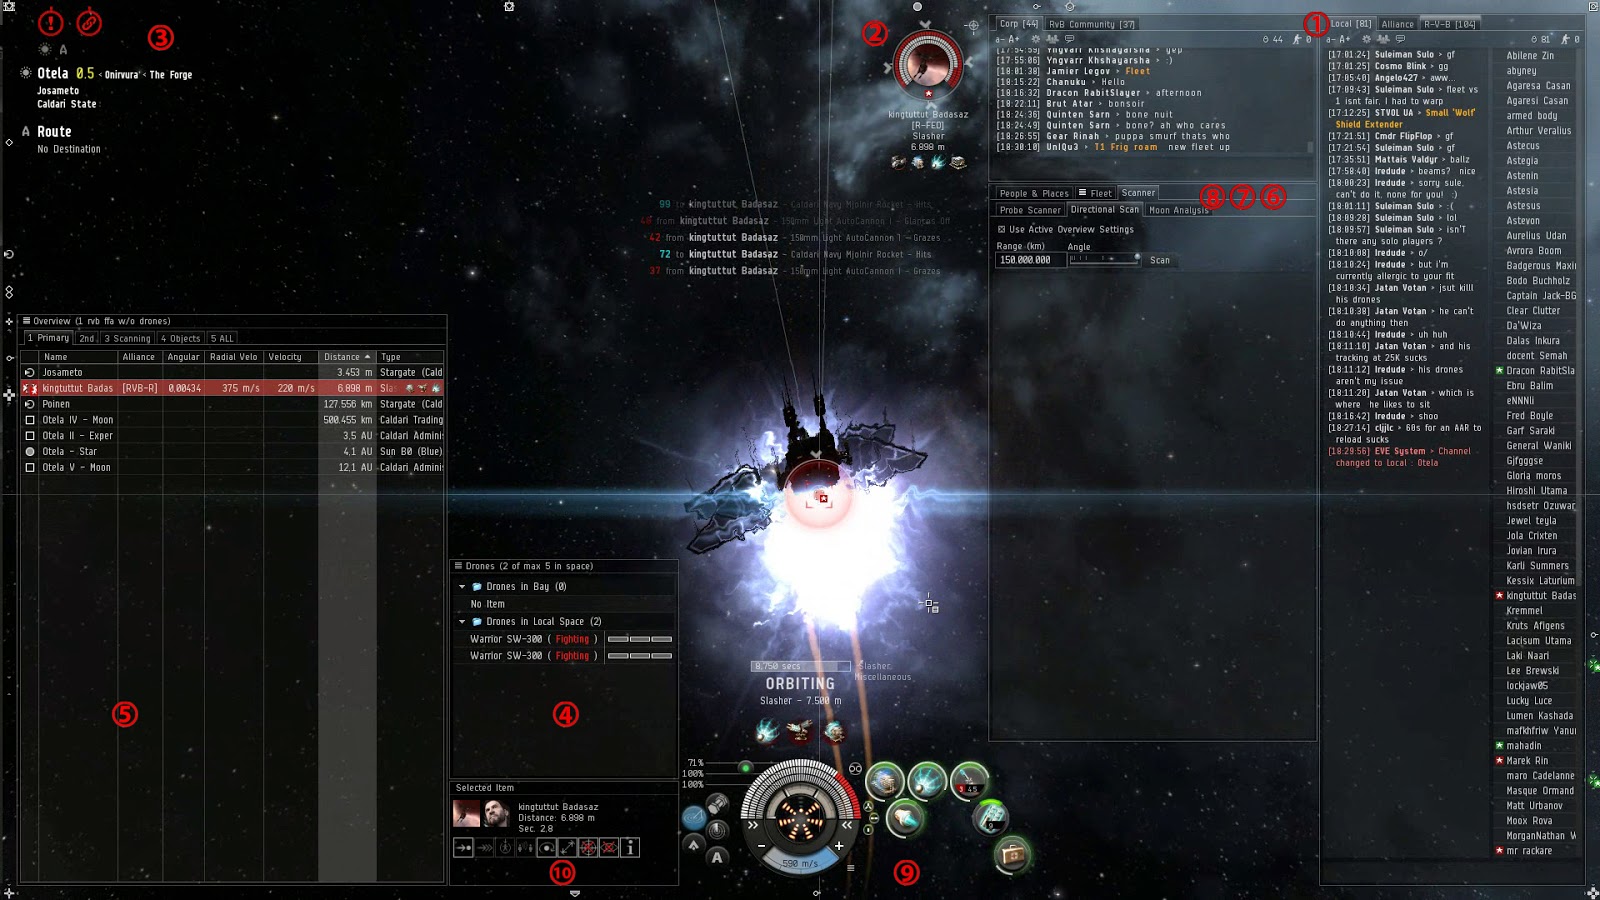
(click on the picture to enlarge)
I always try other positions for my windows
but this picture has all I need
and all windows have the right size for me.
1. Chats
There are many private and public chat windows in this game.
For pvp the most important chats are local window and intel channels.
The local window informs me of how many people are in the system
and if they are friends or enemies.
The symbols and its colors can be changed via Overview Colors.
(Chapter 5.2)
The symbols and its colors can be changed via Overview Colors.
(Chapter 5.2)
I have adjusted my local window to see as many people as possible.
The window cant be big enough.
I use a compact member list to see even more people
and I have timestamps activated so I wont react on old intelligence.
Same goes for all other channels I use.
Intelligence channels are for pvp only and not every corp/ally has one. You can feel lucky when your corp has one and you should share all related information in it. With a intel channel we can get much more fights than without and it can alert us when some enemies are on there way.
By the way, high ranged mercenaries told me:
We should never smack in local!
2. Target Window

Targets are represented in a target window.
This window displays shield, armor and structure.
It shows also the gap between me and my targets,
and I can see my activated modules/drones.
This window can be used to command my ship,
via right click on a target.
But I use this window mostly to see
how many hit points the enemy has left
and what kind of tank he is using.
3. The top left corner of the UI

Here I can see my aggression status, also called crime watch.
All about crime watch is explained in EVE-Wiki HERE. But its less important, because CCP implemented an option to set safety,
 in the Control Panel, so when I attack some one I wont try something stupid
and lose an Arazu again.
When you go over an icon (with your mouse)
a text will pop up with an explanation.
Below crime watch is the system name and the position where I am. The security status tells me what enemies I can cross. Blue, green and yellow means there can be war targets (security level 1 to 0.5). There are some exceptions, like a act of piracy, but not by default. Light red means watch out for pirates and capital ships (security level 0.4 to 0.1) and dark red means warp bubbles and all kind of nasty stuff (below null).
Did you know that we can 'drag & drop' items and character information into a chat, eh. I use this method to display the system I am in via the 'List Items in Solar System' symbol  . Right click on 'List Items in Solar System' opens a drop down menu with all related objects. But its more common to open the drop down menu via right click in space.
. Right click on 'List Items in Solar System' opens a drop down menu with all related objects. But its more common to open the drop down menu via right click in space.
Thanks to CCP we have now quick access to the autopilot.
Even when I use Optimize Route and Clear Route only.
New is also the search function.
New is also the search function.
Right click on the A opens the related drop-down menu.
4. Drones

In this window I can see when my drones take damage so I can pull them back if needed. I have this window open all the time and command my drones with it. I launch drones via drag & drop and on the same way I let them return to bay. With drag & drop I can also react fast when my drones are under fire. Before the Odyssey patch came out I had to right click on a single drone, or right click on the drones folder, to open a drop down menu and after that I could command my drones.
Now I need only two commands from the drop down menu...
Engage Target
Obviously, I use this drone command when I am engaging an enemy,
but only when my drones do not attack by it self.
Assist
This is the second command I use via the drop down menu
and I use it on a fleet member when he can attack earlier than me.
I tried key bindings for all drone commands
but they still need a mouse to complete.
The drones settings can be open via the drone menu (
 ). I have my drones at aggressive state so they start attacking when I or my drones take damage. And my aggressive drones will start attacking when I do.
5. Overview

This window is very important if not the most important.
In the overview I can see all objects around me
and some objects far away in the same system.
I can also see angular- and radial velocity,
the ship type, and much more if I want.
the ship type, and much more if I want.
The symbol in each row shows the type of the object,
like small and big vessels, stations, wrecks, the list goes on and on.
A yellow mark around this symbol shows me that I be targeted.
When the mark is red I am under fire.
On the right side I can see electronic warfare
modules that are used against me.
By default are distance, velocity, and a name activated.
And as you can see, there can be much more information added.
On top of that, there are up to five tabs to switch the overview on the fly.
But in most cases I need tab one and three only.
Most of my movement I handle with this window and I lock targets with it.
When I am in a fleet it can also show me called targets.
The icon at the left top in this window () opens a drop down menu.
I can change my active overview via the drop down menu.
There I can also open the overview settings,
or import and export settings.
When I am in a fleet it can also show me called targets.
The icon at the left top in this window (
) opens a drop down menu.I can change my active overview via the drop down menu.
There I can also open the overview settings,
or import and export settings.
5.1 Overview Settings
In the overview settings I changed the types in the filter tab, followed by the states. Those two settings dictate what I will see in my overview. I pushed deselect all, added Pirate NPC in the NPC folder and I added all ships in the ships folder. Then I switched to States and deactivated entries with pilot is in your ally/fleet/corp/militia and saved it as '1 PvP Fleet' via the drop down menu at the top left corner. Then I did the same with drones and saved it as '2 Drones w/o Friends'. The number stays for the tab I will use in my overview and the name is a short description when to use this setting.- Tab1 is my main overview and I use this settings to fight enemies
- Tab2 is the same like tab1 but instead of ships it displays drones
- Tab3 I use with the directional scanner to scan down ships, therefor it includes stationary objects that are not in my main overview (like asteroid belts and planets)
- Tab4 shows objects where I can warp to (like wrecks or gates)
- Tab5 has everything in it
Every settings I create(d) are based on my "1 PvP Fleet" settings!
I just add / remove some types and states and save it with a new name.
With both settings you will be able to do some pvp.
No need for additional overview tabs/settings in the beginning.
I just add / remove some types and states and save it with a new name.
With both settings you will be able to do some pvp.
No need for additional overview tabs/settings in the beginning.
All other pvp related types ...
Celestial:
- Asteroid Belt - scanning for players
- Force Field - scanning for players
- Moon - scanning for Players
- Planet - scanning for players
- Stargate - scanning for players
- Sun - good position to align and be while scanning
- Wormhole - this entry is needed to access wormholes via the overview
Charge:
- Bomb - create a gap when this is near you
- Bomb ECM - create a gap when this is near you
- Bomb Energy - create a gap when this is near you
- Interdiction Probe - scanning for a trap
- Scanner Probe - scanning for an ambush
Deployable:
- Mobile Cyno Inhibitor - create a gap when you have a cloak
- Mobile Jump Disruptor - scanning for a trap
- Mobile Depot - own purpose
- Mobile Scan Inhibitor - scanning for hidden places
- Mobile Warp Disruptor - scanning for a trap
NPC: Pirate NPC
- create a gap when this is near you
Station - scanning for players
Jump Portal Array - Same as Wormhole
You can find my actual overview-settings in the Field Reports section.5.2 Collors
The following two pictures shows my appearance tab.
I have many possible targets shown as friends,
be warned!


In the Appearance tab I can change color tag and background of entries shown in my overview. Whats important to say: the entry on the top will override all entries below and to assure you will see war targets with the right colors, even when the enemy is in your group or your friend, than 'pilot is at war with your corp/ally/militia' has to be on the top within color tag and background.
I have the fleet on top of war targets, because the enemy of my enemy is my friend. I have also 'pilot has good/excellent standing' on top of 'pilot is a criminal/suspect/-5' so I wont shoot friends any more. At last, are all shoot able targets set to red or blink blink, so I can attack every enemy on my overview without to worry.
RvB members should also set 'pilot has bad standing' on top of 'pilot is at war with your corp', to ensure not bashing RvB-members when 3th party war-targets are on grid. But this works only without any other bad standings.
5.3 Columns
In the columns tab I can set the information that will shown in my overview.
As I mention before I added angular- and radial velocity, and the item types. I also added the alliance names, because there is no other option to separate third party war targets. Yeah, I know the trick to set war targets to bad and terrible standing, but for some people this isn't an option.
Back to topic...
Militia is the same like Corp/Alliance, but only for faction warfare. There are many more things I could add but they are less useful in my opinion.
By default there are: icon, distance, velocity, and name.
As you can see, the best setup is when having text on the right side,
otherwise some ewar-modules will overwrite important stuff.
otherwise some ewar-modules will overwrite important stuff.
5.4 Ships
In the ships tab I have only ship names selected.
The name is very important when scanning for refugees.
The name is very important when scanning for refugees.
All other settings I don't need to fight enemies,
or I have them already displayed.
or I have them already displayed.
5.5 Overview Tabs
In the overview tabs tab I have five entries...
1 Primary, 2nd, 3 Scanning, 4 Object and 5 All.
Depending on play style I can change my overview-settings in here.
But in most cases I use the drop-down menu in the overview ().
My brackets are unchanged all the time,
but when having performance problems it can be deactivated.
Depending on play style I can change my overview-settings in here.
But in most cases I use the drop-down menu in the overview (
).My brackets are unchanged all the time,
but when having performance problems it can be deactivated.
5.6 Miscellanous
Last but not least is the miscellaneous tab.In it is an option to set called targets on top.

The other entries are unchanged.
6. Directional Scanner
This window is very important too. Most important action I do is checking the space around me, to ensure not get into an ambush. I also use this window to detect and hunt enemies, or to check if some one is following me. My default scan range is one astronomical unit (au), and I have always 'use active overview settings' enabled.

Since Rubicon 1.1 we have the 'use tracking camera' command in the HUD.
And every time before scanning for something I activate the tracking camera.

Then I click on the nearest stationary object (like an asteroid belt or a moon), set angle to small (5°), and press scan. When I want checking for an ambush I set angle to maximum (360°) and hit scan every few seconds. I have always some stationary objects in my overview active before I press scan, so I can be sure to reach the destination.
Since Rubicon 1.1 we have the 'use tracking camera' command in the HUD.
And every time before scanning for something I activate the tracking camera.
When I enter a new system I fly to the sun first and start scanning for enemies at gates and stations with a small angle. The sun is always in the middle of a system and most objects are in a 10au orbit, its the best place to be when scanning for clusters. When I get no results I switch my overview settings and start scanning the cardinal points around the sun with a middle angle (90-180°). Then I try to locate the object by reducing the angle bit by bit and press the scan button every time again, till I can fly to a location near the object I am aiming for. Note: Planets are like the sun when scanning for asteroid belts and moons. And there are even better places to be, but without bookmarks the places are out of reach.
7. People & Places
I have this window at the same position as the directional scanner, because I only need the add location button when making save spots. When entering a new system I normally make me some save spots and then I make some bookmarks 100-200km away of gates/stations. After that I don't need People & Places any more, and I switch back to the directional scanner.
I give my bookmarks a short description of its destination and keep them in folders. For example I named a folder like a gate and bookmarks in it I named with the direction from the gate and distance in km. Don't use the words left and right to describe bookmarks, instead use object names. I am still using some of my old bookmarks, and at worst I have a additional save spot.
To keep it simple I do right click in space and select a maneuver. That's why I don't use this window that much. I could also click in people & places and select a maneuver but without this window it works fine too and it save some room in the UI.
8. Fleet
This window I have also at the same position as the directional scanner, because I don't need both windows at the same time. Whats important to say: Never ever enter or leave a fleet before you undock or jump, and don't forget to activate your voice comms.
You can warp to fleet members via right click on them and select 'warp to'. Also you can add them in a watch list. The fleet chat can be used to warp toward members too.
Leaving the fleet can be done via the related drop down menu ().
).
All other options in this window are for advanced usage only.
Last but not least, in the miscellaneous overview settings (Chapter 5.6)
is an option to move called targets on top.
9. Control Panel
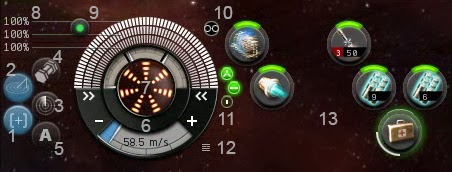
1. Camera
Every time before scanning I activate the tracking camera, and after that I deactivate it again. This button is good to use but floated with options, to many in my opinion.
2. Tactical
This button enables/disables a visually look of the distance between me and objects surrounding me. I like the bird's eye few the most, and with the right angle it can give a better understanding of the battlefield. It helped me also when I made undock-bookmarks.
3. Scanner
I have the scanner activated all the time and I don't need this button much.
4. Cargo
Drop your loot into here. With 'drag & drop' you can quick loot stuff without the need of an open cargo window. And don't use it for any thing else! The inventory in the NEOCom is much better and you will need the inventory to refit your ships (in space and at stations).
5. Autopilot
Don't use the autopilot for pvp, except you want get caught by pirates!
6. Speed
This section can be used to adjust velocity. When I act as a bait I like throttling speed so people don't know what modules I use. It comes also handy when the fleet align something, then I check velocity of my companions and adept myself. To do so I justify the velocity with my mouse, on the bottom of the control panel.

But then I have to press CTRL+ALT+ Space to get back to max speed.
Note: Never ever use throttling speed in a fight, NEVER!11
7. Capacitor
The schwartz is needed to activate your modules.
May the schwartz be with you.
May the schwartz be with you.
8. Tank
Visualization of shield, armor, and structure.
9. Safety
Always use the green status, except you wanna become a pirate!
10. Grouping
A game detail that make pvp less annoying. I use it always to group my weapons. Only exception I know is when shooting a POS. Therefor is a stable capacitor needed and some loadouts have to deactivate 1-2 weapons to get more schwartz.
11. Overheating
Another game detail that should made pvp less annoying, but this buttons doesn't help me at all, instead I overheat modules via key-bindings.
12. Options
This options can be used to change the behavior and visualization of modules and tank. The alerts are most important in my opinion. As active shield tank my shield alert me when I can activate the shield booster, and the armor alarm goes off when I can repair my ship. Armor and shield alarm are set to 30-40% when I use a passive tank.
13. Modules
Here I can activate/deactivate the modules via mouse or keyboard,
and mostly I use my keyboard to do so.
and mostly I use my keyboard to do so.
Azual Skoll has a very nice article about key-bindings in his altruist blog.
His article is still up to date and I did it exact like he did.
Btw movement key bindings can all be cleared.
There is no use to navigate your vessel via WASD
and those keys are the most important on your keyboard.
10. Selected Item
This window uses greenhorns the most to command their ship. But its inefficient to select an object and after that command the ship via the select item window. I prefer right click on an object to open a drop-down menu with even more commands to choose from.
A useful command is the warp to button, when I am already align to an object and some one try to catch me. Apart from that I have no use to command my ship via selected item. For experienced players is this window more a reminder of the selected object, nothing else.
A useful command is the warp to button, when I am already align to an object and some one try to catch me. Apart from that I have no use to command my ship via selected item. For experienced players is this window more a reminder of the selected object, nothing else.
11. Navigation
Sometimes I want cancel my command and therefor I press CTRL+Space.
This command will cancel the maneuver if possible and stops my ship ASAP.
And when I press CTRL+ALT+ Space my ship will get back to max speed.Double left click in space pushes my ship in that direction
and I use it rarely to intercept an enemy, or uncloak an enemy if I'm lucky.
Uncloaking the enemies works best with a drone assist train.
Uncloaking the enemies works best with a drone assist train.
With a right click on an object I can choose between several commands. It doesn't matter if I right click on an object in my target window, or in the overview, or at space. But to be hornet in most cases I right click in the overview, while otherwise a target could not be locked, or I had to find the object in space.
Many times I also right click in empty space or click on List Items in Solar System
and this gives me access to stationary objects and my private- and corp bookmarks.
With this drop down menus I navigate my ship. I have no needs to navigate my ship via the selected item window or People & Places.
Most right click commands I use are ...
align to
I use this command to be able to escape ASAP, but the destination has to be over 150km away. An aligned ship warps a few seconds earlier than a ship that has to align first. When I am scrambled but need a warp quick then I use this command to escape a fight too.
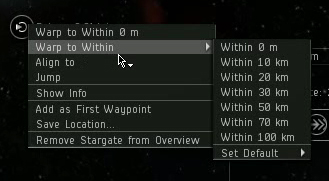
warp to
This command should be common sense.
Don't use the jump button instead,
Don't use the jump button instead,
otherwise you can miss action.
Or much worse, you could follow enemies into a trap.
Or much worse, you could follow enemies into a trap.
When chasing an refugee I right click on the object
my enemy was warping to and select the same command too.
my enemy was warping to and select the same command too.
warp to at
Same as above. Depending on my ship I use this command to warp in at distance. I also use this command with my bookmarks so enemies wont wait on my known locations. Sometimes I combine 'warp to at' with my bookmarks to chase an enemy. For example: The target is 130km away of a gate, but my bookmark is 200km away of the gate. The gap is closed when I warp to my destination at 70km distance.
approach
This command works within 150km of the object only.
Its most common way to engage an enemy, but it shouldn't be.
Its good to use at gatecamps and against missiles, nothing else!
When I try to catch some one I use 'orbit at' instead,
or I double click in space and try to intercept the enemy.
When I double click on an object
my ship starts flying toward the direction too.
or I double click in space and try to intercept the enemy.
When I double click on an object
my ship starts flying toward the direction too.
orbit at
Primary I use this command to engage my enemies,
because it keeps me moving and I cant be hit that easy.
Targets that are standing still are easier to hit and that's why
I don't use approach and keep at range that much.
show info
This command I use before the fight starts.
It gives me an idea what I have to deal with (ship strengths and enemy age).
look at
At the moment I don't use that command much, but I should.
With some experience it is possible to identify weapon systems
and some active modules the target is using.
For example:
The object has a active shield tank when a blue glow surrounds it,
and a green glow stands for active armor tank.
Alternative you can use key bindings, but you still need your mouse to select an object. Thats why I choose right click over key bindings for this commands.
12. Locking Objects
I lock my targets with CTRL + left click on an object. On the other hand, I could use right click on an object and select lock target. But this is much more time consuming when locking didn't work at the first time. For example: When the target is still in warp and cannot be locked I simply press CTRL and hammer on the left mouse button till I can lock him.
I could select targets from a fleet-window too, but this is more uncommon. A good fleet should have targets tagged in your overview, also they should calling targets via voice comms.
In the options I have 'auto target back' activated, because it can save some time, or makes pvp a bit stress less. But therefor you should have safety enabled, in the control panel.
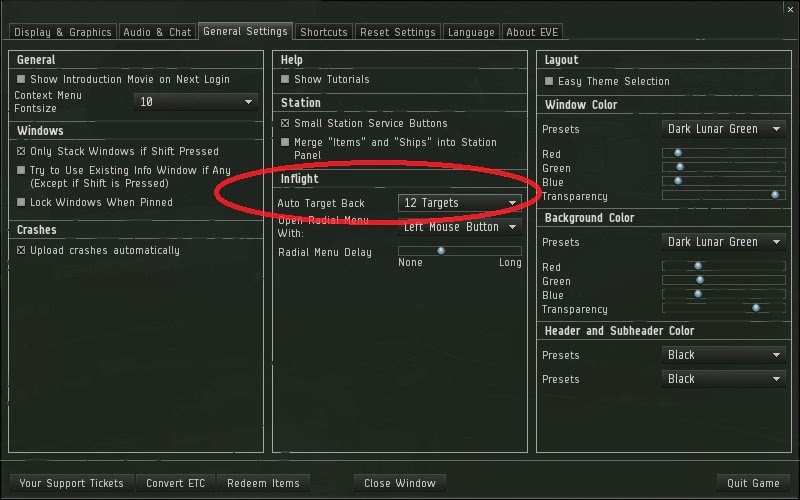 (click on the picture to enlarge)
in the control panel.This was the last chapter in this article.
I am open for any advice that you can give me.
HF & FS
No comments:
Post a Comment